
If you notice that some of your chandelier lights keep going out after the bulb replacement, perhaps it’s time to rewire the chandelier. However, most people don’t know how to rewire a chandelier for the first time. In reality, rewiring the chandelier is not too difficult if you perform the task in the correct manner. For this reason, this article will guide you to rewire a chandelier using the simplest method.
Process Of Rewiring A Chandelier
Usually, a chandelier hangs on a hook or a threaded nipple. This part holds the entire weight of the chandelier. If you want to rewire it, you need to unscrew the nipple from the electrical box. After opening the screws of the box, you’ll see a set of wires mixed together. These are the wires you should modify or change at the time of wiring.
- The first step is to unscrew the junction box and remove the cover. Whenever you’re working with the electrical box, you must shut down the electricity before working. Now, detach the web of the wires from the junction box.
- Secondly, move to the wires of your chandelier bulbs. Generally, you need to remove the light bulbs first. Then, use a screwdriver to unscrew the sockets of the light bulbs. Since the wires are now free from attachment of both ends, you can remove them from the arms of the chandelier.
- Thirdly, bring a wire stripper with some lamp wires from your nearby store, including wire caps that cover exposed wires. Besides, you need some electric tape as well as some new candelabra circuits for wiring tasks. After bringing all the instruments into your working zone, start rewiring your existing chandelier.
- Now, bring the newly bought lamp wires and cut them into pieces according to the length between the bulb sockets and the top of the chandelier chain. Then, thread the wires through the chandelier arms and check if the wires are out through the top. If not, then you need to pull the wires using a metal wire looped into the electrical wires to get to the top.
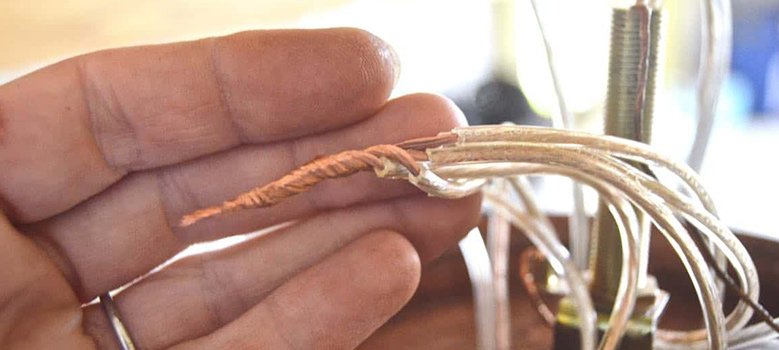
- When you’ve done threading the wires, prepare them now for attaching to the sockets. To do this, you need to split the wire into two individual parts. Then, expose half inches of wire by removing the outer plastic cover. Not to mention, you can use the wire stripper to perform this task simply.
- After getting the exposed wire end, you need to attach it to the socket. Find the wire connectors of the socket and join the two wire ends to them. Then, tighten the screws of wire connectors and check if the wire ends are placed correctly. Now, repeat the same process for all sockets.
- At this point, you need to move on to the top part of the chandelier now. In that place, you’ve kept a web of wires for further wiring. Now, split the wires just like the socket wire. Besides, remove the plastic cover from the wire ends.
- Afterward, the bulb wires need to be connected to the junction box. So, twist the silver wire ends together in one piece, and the copper wire ends together in another. Besides, these pieces should be capped using wire caps. However, you can also use electrical tape to keep the wire groups separate.
- Finally, you can now rehang your chandelier. Simply, attach the chain into the ceiling hook and screw the cover of the electrical box in place. At last, turn on the power to lighten your chandelier bulbs. And, all of the light bulbs should work now.
Frequently Asked Questions
Why Is It Important To Rewire Chandeliers?
If there is no problem with your chandelier light, you don’t need to rewire it. When a lighting problem runs in one or more of your chandelier arms, you should check if it happens for any bulb. If you see so, you should rewire the chandelier to renew the connection of your chandelier bulbs. This way, you can make all your chandelier bulbs work again.
Can I Rewire A Chandelier By Myself?
Of course, you can. Rewiring a chandelier involves a simple wiring process. Although this may be true, you should understand the entire process before taking any action. To avoid any incident, follow the above-mentioned process and be careful when handling the wires. If you are terrified to face electrical functions, you can hire a professional to do this job for you.
What Kind Of Wire Do I Need For Rewiring?
Actually, there is no fixed choice on this thing. You should choose according to your specific chandelier. Though any type of lamp wire is suitable for this project, the standard choice lies between 14g or 18g stranded wire. However, this standard fits only for less than 50 wattage bulbs. As a matter of fact, you have to consider the combined bulb power and select such a wire which can hold the same level of current flow.
Final Thoughts
Hopefully, these steps will be enough for you to rewire your chandelier. Rewiring your existing chandelier can eliminate the need to purchase a new one. In most cases, rewiring can solve the flickering problem of the bulbs too. As a result, rewiring your chandelier will increase its lifespan.


