The position of the chandelier may become slightly off-centered due to the arrangement of furniture or the dining area. Besides, the remodeling of the room also changes the expected location of the chandelier. For these reasons, you may feel the necessity of moving your chandelier to a perfect place.
So, when you want to keep your old chandelier in the same room, you can adjust it in the desired position. To do this, you must know how to move a chandelier over a few inches without damaging the ceiling. Now, let’s find some ways to make this project real.
Methods Of Moving A Chandelier Over A Few Inches
In this project, you are actually thinking about changing the placement of your chandelier. And, to be specific, you can make this happen using several methods. Here, you don’t need to remodel the whole chandelier setup. Instead, you’ll slightly change the arrangement or positioning to get your chandelier in place.
Moving The Junction Box
Suppose, the length of your square-sized electrical box is four inches, and you need to move your chandelier over three or more inches. In such a condition, you can simply change the location of your junction box to the desired place. If the requirement for movement is two inches or fewer than that, you cannot dig another hole for the new placement of the box.
Since the distance from the edge to the center of the box is two inches. Therefore, moving two inches means keeping the box location within the previous range. To put it another way, you should avoid moving the junction box when you face such a situation.
- First, turn off the electricity from the chandelier. Besides, it is better to put on rubber gloves to avoid accidental electric shocks.
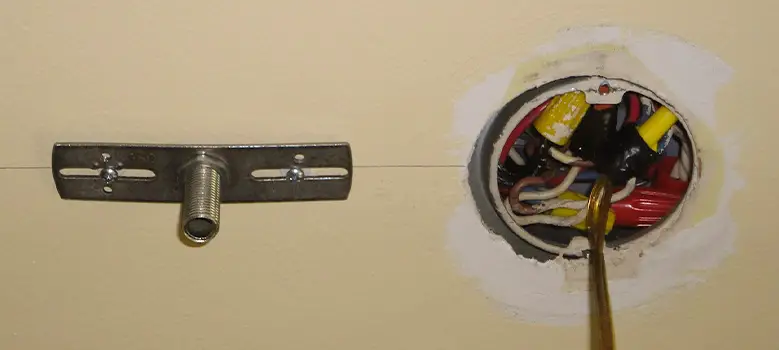
- Then, detach the chandelier from the ceiling. To do this, use a ladder to reach the junction box and remove the outer cover of the box first. After that, remove the wired connections between the chandelier and the junction box. And, bring down the chandelier from the ceiling.
- As the hole of the ceiling is now opened, measure the size of the hole. After getting the exact measurement, trace the same measured outline to your desired location. And, cut the marked place using a saw.
- You need to remove the cutout now and place the previous junction in the new hole. Simply, take out the remaining part of the box and move into that hole. Since the previous hole is now empty, fill it using the new cutout piece of ceiling.
- When the cutout fits perfectly on the previous hole, seal the piece using the gum. Now, you’ll find no sign of the previous position of the chandelier because of covering that hole.
- Next, bring the chandelier into its position and set the wires again on the junction box. And finally, you can screw the box closed and hang the chandelier in the new position.
Reshaping The Hanging Position
If you want to move the chandelier within the range of your previous electrical box length, you can simply reshape the position by modifying the chain position. In that case, you need to work with only the chain and the hook. So, a chandelier with multiple chaining on the hook best suits this project.
- In the first place, carefully determine the angle and desired movement for the chandelier. And, examine the chandelier chain to see if you can move the links freely.
- Identify the direction in which you want to move your chandelier. Now, pull up the chain from the opposite direction and attach the following link to the hook. This will shorten the height of the opposite direction. As a result, the other side will slightly move in the right direction.
- In a similar way, play with the chain links of the opposite direction to move the chandelier to the right place. When you are satisfied with the position of your chandelier, you can stop modifying the chain size.
Using A Hook
Surprisingly, you can use this method for moving your chandelier in any condition. That’s why most people prefer using a hook when changing the location of the chandelier for a few inches. Not to mention, you actually put the weight of the chandelier on the hook in this method. So, you must choose a high-quality hook that can withstand the weight of your chandelier.
- The first thing you should do is to locate the exact point where you want to put the center of your chandelier. Then, mark that place using a pencil.
- Now, bring the high-quality hook which you want to use for hanging the chandelier. Definitely, you can use a power drill to screw the hook into the marked point. Make sure that the attachment of the hook is sturdy enough to hold the chandelier.
- After attaching the hook to the ceiling, hold the middle point of the chain and join it to the hook. Then, release the chain, and the chandelier will be hung to the hook.
- If you don’t want to show the chandelier cord or chain which lies between the previous hook and the new hook, you can hide the cord using a cord cover. Buy a cord cover that has the same color as your ceiling and attach it to that part of the chain.
- When you want to hide the cord, you can measure the distance between the two hooks and attach the same length of the chain to the new hook. As a result, there will be no extra loop on the chain, and the cord will remain touched by the ceiling. So, the excess chain part will be barely noticeable for the visitors.
- After completing the hanging, you can turn on the chandelier now to check if it’s working correctly. And, your chandelier is positioned in the new location.
Last Words
Ultimately, moving a chandelier over a few inches doesn’t require an entirely new installation. If your chandelier has more than one chaining, you can reshape the chaining to move a few inches. Besides, you can either dig a new hole for the junction box or attach a new hook to hang the chandelier into the new position. In both cases, you should hide the changes in your ceiling using a cord cover or filling the previous hole.