
Every household needs a washing machine and a dryer. It is one of the essential needs just after food and health. But if you are moving into a new home, you might need to do some work on installing a dryer vent.
Dryer vents not only is used for venting your dryer but also for venting your house’s air circulation. So it should not be taken lightly when you are installing it.
As intimidating as it may sound, it is actually a very easy job. You will need some handy tools for this though.
One thing you should keep in mind is that installing a dryer vent is easy, but maintaining it is a whole another chapter. Without proper maintenance, it may cause your house to burn down.
That is why we are going to explain step by step how to install a dryer vent through a brick wall in your home. Along with it, some pro tips.
How to Install a Dryer Vent Through a Brick Wall Using Just a Drill, Hammer, and Chisel
Here are the things you will need while you are installing a dryer vent through a brick wall. They might be even in your garage.
Required Items
- A hammer drill.
- A hammer.
- A chisel.
- Venting hood and duct set. (obviously)
- Caulk gun.
Step 1: Measuring Out
Start with the place you want to put your dryer. Choosing it won’t be hard. But keep in mind, it will produce heat. So better give it a little bit of an open place to vent out.
After you have thought out the place you are going to put your washing machine or dryer, measure the hole you want to cut out off the wall.
Use a marker and mark a center point. You can mark a 4 ¼ inch circle ahead of time on the inside. You can also do it afterward you have made the center drill.
Step 2: Drilling the Hole
Put on a masonry drill bit on your drill. Masonry drill bits are for walls and concrete. So it will drill a hole smoothly without any trouble.
Drill on on the marked center and go through the wall. Check on the other side of the wall if possible.
Now that it is done, time for some muscle work.
Step 3: Hammer and Chisel Time
Take your hammer and chisel and start bashing the wall down! Well, not the whole wall, just the one you have marked for the vent.
Be careful of taking apart the wall. Too much hammering might damage the wall and create a crack. We don’t want that to happen. So go easy and steady.
A pro tip would be to drill some more holes around the marked circle. This will help you make the hole with a chisel a lot easier.
Step 4: Installing the Hood and Duct of the Vent
After the hole is made open, check from the outside if there is any more barrier. If not, you are good to install the hood and duct.
For this, you will need to drill some additional holes on the wall to screw the duct on.
There are metal, aluminum, plastic ducts, and hoods. Going for metal ones are better than a plastic one. Because with time, the plastic will crumble.
Step 5: Securing It with Silicone Caulk
When you are done securing the hood and duct of the vent with screws, both on the inside and out, check with the dryer pipes fitting.
You can use a direct pipe or a flexible one. Although the flexible one is a convenient option, remember to clean it regularly. Otherwise, the dirt inside it will heat up and become a fire hazard over time.
And you are done. Place your dryer into position. Feet or two apart won’t affect the dryer vent to perform. But more than that length will end up with your vent not working properly.
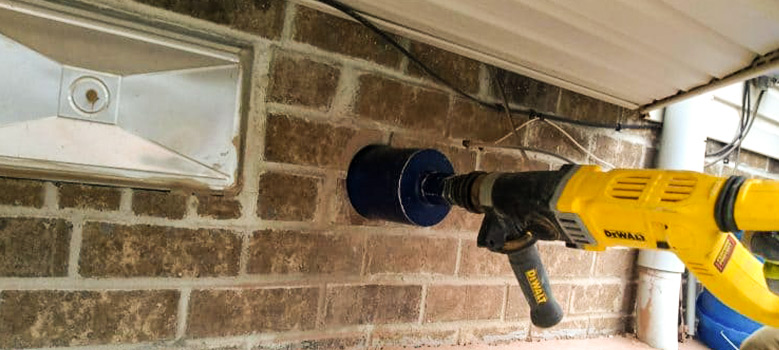
Useful Note: A Brick Hole Saw
To make your work a lot easier, you can invest in a brick hole saw. It fits in your drill and you can drill a hole in the wall efficiently. You won’t need a hammer and a chisel if you have a brick hole saw. It is clean, powerful, and worth the investment.
Frequently Asked Questions
How often should I clean my dryer vent?
It is suggested you clean your dryer vent once a year by a hired professional.
What is the ideal length of a dryer vent?
A dryer vent should always be 35 feet.
What kind of pipe should I go for with my dryer vent?
Metal pipes are ideal for dryer vents. Because plastics can crumble and overheat and cause fire over time.
Can a leaf blower help clean a dryer vent?
Yes. You can use a leaf blower to clean a dryer vent.
Conclusion
Dryer vents are not only essential for drying clothes, but also for the whole house. Once you have established the vent, the work doesn’t stop there. You have to clean them every year. It is estimated almost 15,000 fires happen due to dryer vent clogging. In order to keep the fire at bay, you should check your vent from time to time for any clogging and such.


