
You can substantially alter the footprint of your home by framing a wall or building a basic wall. The framing process is simple, inexpensive, and doesn’t require any special tools or materials. You only need a framing hammer, nails, and two-by-fours to succeed. After you’ve framed the wall, you can add drywall, doors, and windows.
It is the process of creating a wall skeleton by building a wooden frame. The stability and strength of a wall can only be achieved by taking this step. The steps below will help you frame a wall correctly, whether you are creating a new room or adding to an existing one.
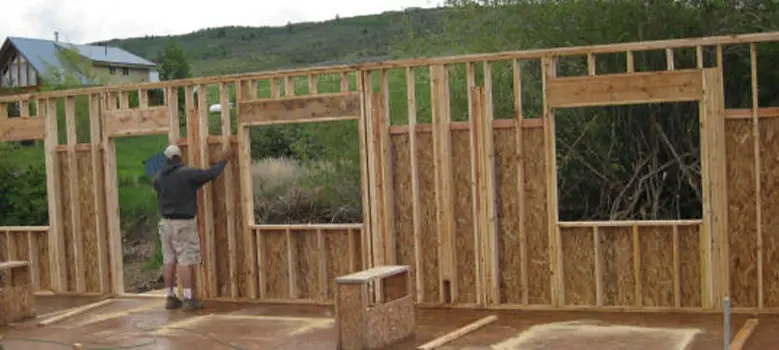
A Few Points to Consider For Framing Long Walls
Almost every home improvement project requires a wall to be framed. To create an addition or convert a garage into an apartment, you’ll need to frame a wall. Walls are required even for small projects such as dividing a large room or building a walk-in closet. There is nothing more simple or more flexible than a framed wall. The strength of this design is due to the precise placement of the studs vertically and horizontally.
⦿Plating at the bottom (horizontal): One two-by-four is used for the bottom sole plate of each framed wall. There is a horizontal two-by-four on the floor and it runs horizontally. Whenever a concrete floor is installed, pressure-treated wood is necessary for the bottom plate.
⦿Wall studs (vertical): For every 8 feet of wall, seven vertical two-by-fours run perpendicularly. A connection will be made between them and the top plates at the top. Local codes and project requirements determine the spacing between studs, which is 16 inches or 24 inches. Studs should be spaced every 16 inches to prevent structural damage.
⦿Horizontal top plates: To support the bottom plate, two two-by-fours are placed parallel to one another. Vertical studs and ceilings are connected to this plate.
Rules, Regulations, and Permits
A building permit is usually required by most communities before you build a wall. It may be necessary to obtain a permit for wall framing when converting a garage to a living area. Changes to the interior space may be structural or non-structural, depending on the situation. A building permit and related inspections are likely to be required regardless of whether the wall you are framing is load-bearing or not.
Considerations Related to Safety
Whenever you need to remove another wall to frame a wall, you should make sure you place a supporting system behind it. Two-by-four walls or steel columns made of adjustable steel can be used to create a temporary wall.
Here Are the Things You Need
Tools and Equipment:
⦿Use a framing hammer
⦿A speed square pencil
⦿Chalk
⦿Circular or electric miter saw
⦿Use a powder nailed (in the case of concrete floors)
⦿Wearing safety glasses
⦿10 premium two-by-fours, each 8-foot
⦿Nails with a diameter of 16d (3 1/2 inches)
How to Frame a Long Wall Detailed Instructions
Method 1: Choosing the Right Layout and Foundation
Step 1: The layout should be planned: You can mark the location of the wall on the floor with a chalk line (a cheap tool for marking long, straight lines) and an angle measuring tool. If you intend to install doors in the wall, be sure to note them.
⦿It is required that all four corners of the wall maintain a 90-degree angle. The slightest deviation now will make the wallless secure in the future.
⦿Be sure to note whether your new wall runs parallel to or perpendicular to the joists (floor or ceiling girders).
Step 2: Make the plates out of cardboard. Divide the 2″ by 4″ boards into groups of equal length using strong, pressure-treated wood. Base pieces anchor the frames to the wall by running between the wall and the frames. Ensure that the top is always covered with two plates.
Step 3: Mark the plates before adding studs: Place the top and bottom plates in close proximity. In the middle of both plates, mark once every 16″ from one end to the other. You need to mark an “X” on the right side since the measurements are 16″ in the center. Stud placement will be made easier by following these guidelines.
Method 2: The Process of Framing a Basement Wall
Step 1: Make sure the bottom plate is secure. Following the chalk line marking where the wall will be, lay the bottom plate down. This plate needs to be attached to the concrete floor to form a stable wall.
⦿The wood and concrete should be joined using a power-actuated tool. Using this tool, you will need to load it with a small bullet and nail and then blast it into the concrete with the nail or bullet at the end of the tool to engage the bullet and launch the nail into the concrete.
⦿You should then place a nail every 16″ along with the board, toward the center, following your guidelines.
Step 2: Plates on top and bottom must be combined. Generally, this is a straightforward task if the ceiling joists run parallel to the bottom plate; the opposite is true if they run parallel.
⦿The top plate should be attached perpendicularly between two parallel joists every 16″. Use short lengths of 2″ by 4″ blocking board.
⦿If perpendicular joists are used, attach the top plate to the ceiling using joists. Align the top plate with a plumb bob. Make sure the top plate is directly above the bottom plate. Once the top plate has been placed on top, nail it at every interval.
⦿A wall can also be built first and then put up to make it easier, especially for beginners.
Step 3: Make sure the studs are installed: A stud is simply two sides of wood that are two-by-four inches thick, or two-by-six inches thick for exterior walls, and it is used to support and define the finishing surface of the drywall and other materials.
⦿Make sure you measure and cut. It is important to cut the stud boards so that they fit snugly between the top and bottom plates without tipping.
⦿A stud needs to be inserted. It fits right over a nail on the bottom plate by sliding it end-on between them. Ensure that the board is placed squarely and straight using a plumb bob and a corner.
⦿Repeat the process. Repeat the process until you have installed studs down the frame, firmly inserting three-inch nails through each of the ends and into the top and bottom plates.
Step 4: Blocking boards need to be installed. They are also used to hang cabinets, towel bars, or grab bars. Blocking boards add a bit of additional structure to the bathroom. If a house fire breaks out, it can also act as fire breaks. As with everything else you’ve made so far, they’re made from 2″ by 4″ boards.
Put your blocking boards into place, end-on, about 4 feet (1.2 m) above each stud, so that they will fit snugly between them. The blocking boards should be securely attached with 3″ nails on both sides, hammered in at a 60-degree angle. The height of the block should vary slightly from block to block so you can push the tacks and nails in easier.
Method 3: The Process of Framing a House Wall
Step 1: Measure the area where you will install a wall. The height of the wall to be framed as well as its width must be measured with a tape measure. Top and bottom frames will be measured using the width, while individual studs will be measured using the height.
⦿A wall for a room other than a basement is typically constructed on the floor first, then lifted and moved into place before being attached to joists and beams. For the wall to be the correct height, every stud must be precisely the right length.
⦿The space should be filled with 2 x 4. You’ll need a stud every 16 inches depending on the wall’s height. Additionally, there will be a frame for each wall, which will determine the wall’s width. To determine the required number of studs, divide the width by 16.
Step 2: Measure your measurements before cutting studs and plates. Measure the angles on the plates and studs and cut them with a circular saw. Using the width measurements you took, cut the bottom and top plates that correspond to your wall assembly. Make sure they’re flush with each other and smooth the ends if needed. As a next step, measure the height of the studs and cut them accordingly.
The total height of the measurement needs to be subtracted from the width of the bottom and top plates.
Step 3: Pins should be used to secure the top and bottom plates. Mark the top and bottom frames with a tape measure and pencil lines. When studs are meeting the plate, it is important to mark their centers and ends. During loading, the holes in the studs must be measured carefully to prevent damage. It is recommended that studs are positioned every 16 inches (40.6 cm).
⦿The first mark should be drawn at 16 inches (40.6 cm). Subtract 3 3/4″ from that mark and draw a line (at 15 1/4 in.). Consequently, use the shorter end of the framing square which is the exact width of the 2×4-to account for the width of the end studs and the distance between the centers between them.
⦿The next measure you need to make is 16 inches. In the bottom and top plates, make an “x” for the center of the next stud, subtract for the endpoint, and mark the marks for the studs. Repeat this process on both the bottom and top plates.
Step 4: Make sure the frame is assembled. The boards can be laid on the ground to build the frame of the correct size and shape with the help of the studs you provide. The end stud should be the starting point.
⦿It is important to align the boards with the end studs in a flat position. 3″ nails can be used to drive it directly through the bottom plate from underneath.
⦿Assemble the bottom plate by centering all the studs after going over the lines. Use your markings to ensure that each stud is 16″ apart and fastened with 3″ nails.
⦿Attach the top plate to the bottom plate. After attaching the studs to the bottom plate, the top plate should be placed on top of the base plate, and 3″ nails should be used to connect each stud.
Step 5: Blocking boards should be filled in. Approximately four feet (1.2 meters) above the bottom of the wall, blockers fit perpendicularly between the studs. Make sure the board is cut appropriately to fill the gap between the studs and secure it by hammering three 3″ nails into them at a 60-degree angle on both ends.
⦿You can nail each blocking board neatly if you stagger the height of each board. Repeat the pattern to finish the second blocking board by joining the top lip to the bottom lip, then doing the opposite with the next board. Then you can nail them each to a stud with enough space to do so.
Step 6: It’s time to raise the wall. By lifting the frame over the top plate and forging the bottom plate with a friend, the frame will remain on the ground when you lift it off. Make sure everything is squarely positioned and the frame is properly slid into place.
Step 7: Check each section for plumpness and shim each section. Check your wall’s straightness and secureness, flush against the subfloor joists; once you have it installed. The art of shimming involves filling in any gaps created by a small error in human measurements in the ceiling and frame using slender wood pieces. It’s easier to insert these from the side as there is some space on the mounting bracket, as you can usually purchase them from most home repair stores.
⦿Check that the current wall section is perfectly vertical before checking for plumb. This can be done with the aid of a level. The wall can be moved forward or back with your hammer if necessary.
Step 8: A wall should be secured to beams or joists in the appropriate way. As soon as you are ready to attach the top plate, attach the bottom plate. At close, regular intervals during plumbing and leveling, use 3 1/2″ light construction nails.
⦿Make sure the bottom plate is attached. Drive 3 1/2″ nails into the floor by driving through the plate.
⦿Hammer three 1/2″ nails along with the end studs of the houses to the framing.
⦿If the studs are not properly fastened and leveled, verify that they have been fastened.
Frequently Asked Questions
How Do I Frame a 20-Foot-High Wall?
Approximately 16 to 19 2*6 vertical studs spaced 16 inches on-center are necessary for a 20-foot exterior wall, shed wall, or load-bearing wall. Math’s calculation, 1) 20×12 = 240″, 2) 240÷16 = 15, 3) 15+1 = 16, 4) 16×1.15 = 18.4, rounded to 19, thus it will take 16 to 19 number of 2×6 studs to frame a 20-foot wall with 16 inches on centers, stud placement.
How Do I Frame a 24-Foot Wall?
Approximately 19 to 22 2×6 vertical studs spaced 16 inches on-center are needed for a 24-foot exterior wall, shed wall, or load-bearing wall. Math’s calculation, 1) 24×12 = 288″, 2) 288÷16 = 18, 3) 18+1 = 19, 4) 19×1.15 = 21.85, rounded to 22, thus it will take 19 to 22 number of 2×6 studs to frame a 24-foot wall with 16 inches on centers, stud placement.
How To Frame a Tall 16 Wall?
You will need approximately 13 to 15 2*4 vertical studs spaced 16″ inches on-center to build a 16-foot exterior or interior wall, partition room wall, shed wall, or load-bearing wall. Math’s calculation, 1) 16×12 = 192″, 2) 192÷16 = 12, 3) 12+1 = 13, 4) 13×1.15 = 14.95, rounded to 15, thus it will take 13 to 15 number of 2×4 studs to frame a 16-foot wall with 16 inches on centers, stud placement.
Conclusion
The stud locations should be measured and marked meticulously. Sheet goods, like plywood and drywall, require accurate alignment before being installed. Rather than adding windows or doors retroactively, make sure they are built-in while it’s being framed.
When installing sheathing on wall frames, such as in sheds and other home areas, it may be helpful to do so while the frame is still flat on the ground so that the sheathing can be installed. Sheathing should be installed on the wall frame to make the frame square.
The top plates should only be nailed over the studs when attached. Electrical and plumbing workers have trouble drilling holes in plates with nails between studs. To ensure that the edge of the drywall will attach securely, nail an extra two-by-four to the back of one of the inside corners of the room.


