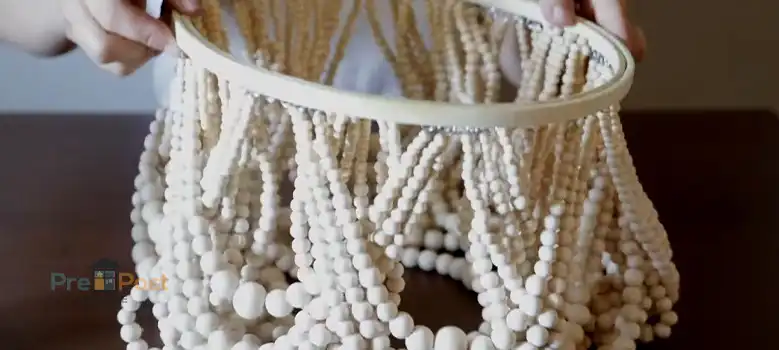
Decorating a chandelier with beads is a kind of artistic arrangement of beads that provides soft light and a mild atmosphere surrounding rooms.
Beaded chandeliers are typically used as a decorative component before being used as a light fixture. Remember that they don’t provide as much light as an open LED chandelier – in other words, you shouldn’t rely on these fixtures to light up a whole room. It’s just used for soft lighting and a magical atmosphere in the room.
And it can be extremely helpful when it is designed correctly, such as in the shape of a dome, bell, or cone. However, certain designs do not provide adequate light if not constructed correctly because they absorb light. The absorption of light by other designs produces magnificent shadows. In this post, we will explore how to decorate a chandelier with beads effectively.
How to Decorate a Chandelier with Beads
Beads in different shapes, and colors are necessary to decorate our chandeliers. We will follow a systematic step-by-step process to look it more professional and attractive. All things considered, it will give us an eye-catching look with beads.
We will decorate a traditional and old chandelier with beads to give it a fresh new look. Translucent glass beads enable light to shine through, adding a touch of glitz. Similarly, colorful beads give our eyes comfort. We recommend you better to use very lite colors to enrich your art.
Required Materials
We need some materials to decorate a chandelier with beads in different shapes and colors.
- Beaded tie-back tassels
- Spray painter in different colors
- Metal beading wire
- Glass beads and gold charms
- Eye pins
- Beaded pendant lamp chandelier
- Scissors
- Beading needle
- Needle-nose pliers
- Light in a different color
Step 1: Prepare Your Beads
To make the beads ready, spray them with white paint first. Dry them before applying the second layer of paint if necessary. After the entire project is put together, your beads are prepared for your project.
Step 2: Prepare The Wire Basket
Spray paint the wire basket and chains to make them seem beautiful and new. Again dry it up and make it ready for your project.
Step 3: Wire Your Chandelier
In this step, we will shape the basket with wire and structure the frame. Here we recommend you use hot glue. Remember one thing, you have to ve very careful when you wire the basket. Because the shape of the chandeliers depends on this step.
Wiring The Bottom Of The Chandelier
Take your first necklace and a piece of wire to wire the bottom of the chandelier. Wrap the wire around the thread between the first two beads and check it twice to ensure the wire does not come loose from the necklace. The necklace should then be wired to the top of the wire basket form. Wrap the wire securely around the basket at least twice to ensure it is secure. For the time being, ignore the wire’s termination.
Wiring the top of the Chandelier
Let’s move to the top sight of your chandelier. Pull it up to the point where the chains connect at the top of the hanging basket. Wire the beads to the top link in one of the chains with a long piece of wire. Return the bead to the basket and wire it to an existing beading segment.
Additional beads can be strung onto metal eye pins. With pliers, bend the straight top of the pins down to make a loop. To attach to the chandelier, wrap the head with a tiny length of wire. Attach a gold charm to the end of each pin using a little piece of wire.
Depending on your style and decor, add additional accessories such as ribbon, butterflies, bows, and so on.
Step 4: Lighting Your Chandelier
Lighting is a major task that makes the chandelier more attractive and vivid. There you can choose any kind of lighting you like most. Though beaded chandeliers provide mild light but create a magical atmosphere surrounding the room space. We recommend you pick little light in lite color. Set the light into the chandeliers.
Frequently Ask Questions (FAQs)
How Can I Dress Up A Chandelier?
It depends on your preference for art and design. You can decorate a traditional chandelier with beads to give it a new look. Translucent glass beads allow light to shine through, creating a glitzy touch. Beads of varying shades and crystal beads complement the design of the old chandelier.
How Can I Make My Chandelier Look Better?
There are many ways you can follow to make your chandelier look better. You can use spray paint to make it different in color. Beaded chandeliers seem attractive as well. In the same way, we can also add hanging crystals to look better.
How To Make A Mini Mead Chandelier?
Whether you have limited space in your room, mini bead chandeliers can be a great solution here. It looks attractive in a short space. Decorating a mini bead chandelier is similar to the process of the beaded chandelier.
Conclusion
Crystal and colorful beads simply make chandeliers more attractive. Whereas we use hanging crystals and beads in different shapes, it looks like diamonds and pearls hanging in the air in the chandelier. There are many customized shops for beaded chandeliers and they are professional and artistic. Decorating a home alone is not an easy job for everyone. Therefore it’s better to get help from professionals.

