Whether you are renovating or building your home from scratch, you will have an angled wall somewhere in your house. Even moving in in a new place might need some renovation works done for your liking.
An angled wall is a bit tricky to deal with. Firstly, you can’t just go on and frame it with just wood planks. As there is measurement involved, you don’t want to mess it up.
You have to take some simple, easy steps to make the angled wall beautiful. And to do that, you have to frame it accordingly. We are going to take you through the steps to how to frame an angled wall perfectly.
The measurement part might sound a bit hard, but in reality, it isn’t. You will learn something really useful and it is almost like a magic trick.
How to Frame an Angled Wall in Just 4 Steps
To start with your framing, you might need a few things. But mainly, nails and circular saw will do all your hard work for you.
Things You Will Need
- Circular saw with angle meter.
- A measuring tape.
- A nail gun.
- A hammer.
- Nails.
- Pencil for marking.
Step 1: Measure the Wall
Start by taking the walls measuring. This will let you know what kind of design you are going for. Without the measuring, you won’t be able to put up the frame you want to. And it will offset the whole place.
So start by taking measures with a measuring tape. Write them down on paper. Also, measure what angle the wall is. And find out the middle point of the angle. This will come in handy while we are marking the studs.
Step 2: Mark the Studs
After you are done measuring, it’s time for gathering the goods. Measure out the studs you want in which length and width. You might need to cut them into different pieces to fit in with your angled wall.
When all the studs are ready for the frame, mark them to form the angle. The frame length will be in two separate parts and then put together to form the wall. Makes sense?
For example, if you have a 45-degree wall, your framing studs should be cut into 22.5 degrees in order to form the 45-degree frame. Easy as that.
Step 3: Cut the Studs to Your Desired Length
Now that you have marked your studs, it’s time to cut them into the angle shape. Use the circular saw and cut through your marking.
Modern circular saws have to measure scales on them, so you can set the right angle and keep on sawing without marking your studs.
Step 4: Put Them Together
When you are done with cutting your studs into your preferred length and corners, it’s time to put them together.
Gather them first in one place and put them up. And mark them where you want the studs to stand. Marking will help you later when you are nailing them down on the frame.
Start nailing them down one by one on the angled wall. Better would be if you build half of the frame before nailing them on the wall. This will give you an idea of the angle beforehand. And you can also check if it fits perfectly.
From then on, it’s just nailing them down on the angled wall. After you are done nailing all of them down, a magic empty space will appear, that we will fill in now.
The Empty Corner Filling
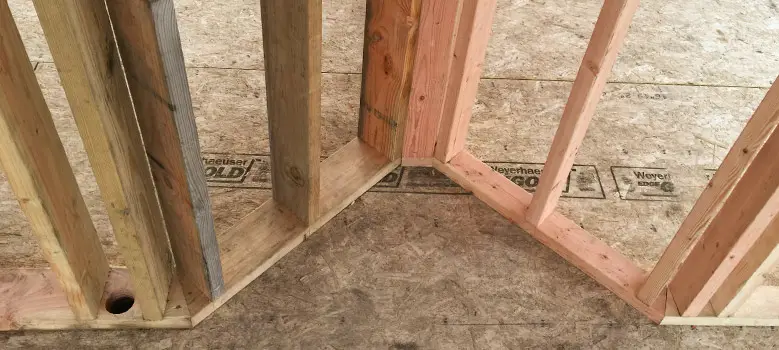
The empty corner that is formed by the framing can be filled with a stud. You have to cut the stud length-wise at the right angle of the corner. If your angle wall needs a 50-degree corner, then you should cut the stud length-wise at 50 degrees.
You will be left with a small plank and a big one. Don’t get puzzled. Put the smaller one on top of the big one and form a triangle. That is your apex. You just push it into the empty place of the frame that is left open. And now you will have no gaps in the corner.
Pro tip: Nail the apex triangle with nails before pushing it in the empty corner. This will give it a better grip.
Frequently Asked Questions
How to measure an angled corner of a wall?
Using a protractor you can measure the angle of a wall corner.
Can I use metal studs instead of wood to frame an angled wall frame?
Yes, you can. It is the same method as wood frames and uses screws instead of nails.
How should I know the level of accuracy of a frame?
Using a water level or laser level device, you can get the accurate level of your frame.
Conclusion
Although it might sound like a lot of hard work putting up an angled wall frame, it is actually easy. The hard part is with measuring and correcting it. If you don’t take it carefully, you might leave some gaps after the frame is put up. So be cautious about it. Once your frame is put up, you will be amazed by your work yourself. Not to mention the feeling of achievement.

