Many people around the world are passionate about water or snow skiing. It is generally an adventurous game. If you are a person who has an interest in water skiing, then it is very natural to have water skis for you. There are many types of water skis on the market. Some of them are so expensive that you will be more conscious of taking care of them. The best solution is that you can hang the water skis on your wall.
Sometimes people cannot understand how to hang water skis on their walls. If you have faced that type of problem, then welcome! Here I’m to help you. Please read more to get more information about the problem.
Methods: How to Hang Water Skis on a Wall
It is mandatory to arrange some necessary things first that will enable you to implement any task. If you want to hang water skis on your wall, you need some materials. Here I will tell you about the materials.
- A pencil
- Ladder (If you require it)
- Some good mounting screws. You can use any type of perfect hardware or drywall anchor screws. In this case, black color screws appear better.
- Manual screwdriver or power drill.
- An old leather with one feet measurement. You also can use new leather because it can be substituted.
- Scissors. It will help to cut the leather.
After arranging these materials, you can start the main task. You can hang the skis on your wall with the help of two methods. If you want, then it is possible to hang it parallel. In contrast, hanging the crossed water skis will also be possible. But for the crossed skis, there is another rule to hang them on the wall. So here we go.
Non-crossed Water Skis Hanging Method
According to the measurement of the wall and your wish, you can hang your water skis as non-crossed. But, at first, remember to measure your wall and think about whether it will be consistent with your wall pattern.
Step 1
It is essential to lay out the water skis display on your floor and then start the first step up a ladder. To maximize the decorating space, consciously arrange the water skis on the ground playing with your various imaginations. This process allows you to suit your personal preference, test, and style.
Step 2
After arranging the water skis on the ground floor, grab the scissor and leather strap. Taking the leather, you have to lay it over your skis, snugging up one end of the leather to the border of the skis. But in this process, be aware of leaving enough additional leather flat with your ground. The process will help you to fit the screws. When you hold the end, then stretch the leather over the water skis and wrap the leather over to the other side.
Step 3
Now, mark the spot and cut the leather. When you have the strips of the leather of two skis, then begin to start a screw through the leather strip’s one end. In this process, you will not fumble when you are 35 feet up the ladder. Generally, after being ready and in position, you may need a spotter or helper on the ground hand to give you the screwdriver, skis, and so on.
Bringing the skis up the ladder will be beneficial before drilling into your wall. Then you have to hold the skis in position with the spotter adjusting movement. After deciding on the perfect spot, you have to lower the top ski to the spotter. Then, use your pencil to mark just below the lower border of the bottom ski just below the binding. However, grab your manual screwdriver or drill gun by lowering the bottom ski. Then, you must drill one side of the leather into the marked spot.
Step 4
It is time to bring up the bottom ski. Grab your ski into its position with the leather strap center of the ski or below the bindings. Then stretch your leather over the ski. After that, you have to drill your second screw as near as possible to the ski border.
After anchoring the ski tightly with the leather strap, it is time to adjust the angle if necessary. There is no necessity to adjust the ski if you think it has the best angle. So, take your second ski and then a leather strap up the ladder. Then repeat the activity as above.
If the wall you want to hang on the skis has poor quality drywall and you want extra security, then it will be better to select a drywall anchor to use. There are many anchors that can hold up to 75 pounds of weight each. In the case of a drywall anchor, it will go into your wall before drilling in the screw. On the other hand, if you want to hang your vintage or antique skis on the wall forever, then please use drywall anchors.
Crossed Water Skis Hanging Method
Generally, it is quite difficult to hang water skis as crossed. But don’t be worried. I will help you by sharing some effective tips so that you can handle the problem easily.
Step 1
If the skis have metallic bindings, you must use a strong dark or florist green wire. After that, you have to take your skis up the ladder. Hold the skis in their position with the spotter adjusting your movements. Then, use the pencil to spot the wall where the outside of your water skis can meet.
Step 2
Now, you must slightly toss or lower the skis to the spotter. After perfectly making X-shaped skis on the ground, you have to grab the scissors and leather strap. So, taking the leather, lay it over your water skis, ‘snugging’ up one end of the leather to the borer of the skis.
But you have to ensure enough additional leather flat with the ground that it will suit the screw. When you hold the end, stretch your leather over your water skis. Then wrap the leather over to the other side.
Step 3
For a vintage or antique skis, it is necessary to adjust the leather strip’s length because of the camber or curve of the antique skis. So, you should squish your skis slightly and measure the leather strip if the vintage skis have any camber.
After that, stain the spot and then cut the leather. You have to stretch the leather tightly. Then mark spots for the screws. After that, you have to pre-drill your screws through the leather.
Step 4
It is time to climb by doing a good shoulder stretch. At first, climb up with the help of your ladder with the pre-drilled leather strip power drill or screwdriver. Then drill the side or lower screw of the leather strip into the marked spot. After that, grab the spotter’s hand up the skis and set the crossed skis against your wall. At this time, hold the skis with the help of your non-dominated face or hand. If you have a spotter eight feet tall or have two ladders, then use them to hold your skis in their position at the time of working. After bringing your crossed skis into the perfect position, it is time to snug up with your pre-drilled leather strip.
Step 5
Now, you have to stretch your leather strip across your skis. Then hold the skis in their place with the help of your non-dominate thumb and free fingers. Now, hold the drill or screwdriver from your pocket and then screw it into place.
At the finishing moment, you can have the crossed skis hung on your wall! But in this step, you may face a problem. Sometimes, one ski can slip and straighten through the leather strap on the wall. So, you have to place a long screw in your wall above your crossed water skis.
So, following these ideas, you can easily hang the water skis on your wall.
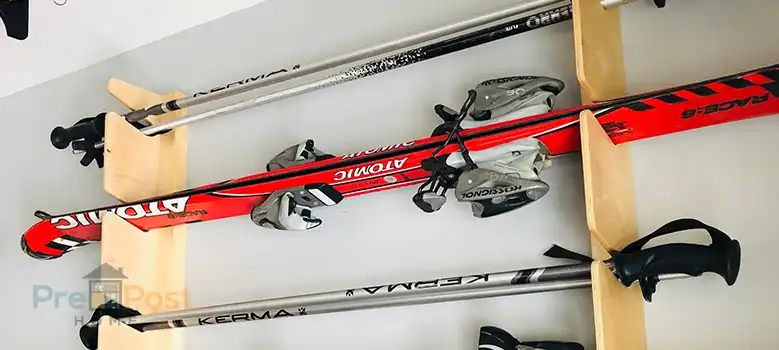
How Do You Make a Hanging Ski Rack?
There are very easy and smart techniques to make a hanging rack for the water skis. At first, you have to cut the plywood 4 inches wide. There is the advantage of keeping any length according to your desire. You can hang many sets of skis that you want on the rack. You have a set of pegs for the sets of your skis. If you cannot understand the length, then it will be better to cut down 4 inches in width. After that, ass all the hooks and pegs. Adding the hooks and pegs, you will cut the length at the end.
Then you have to cut 6 inches of the peg’s length. After that, gently measure and then mark the pegs as your requirements. Make sure to cut 2 inches apart each set of the pegs measured from their center. Then drill the holes for the sets with a 7/8 inches Forster bit. Now use wood glue to adhere the pegs into these holes. Then add your screw hooks and cut the final length. Sometimes later, you can feel the pegs are warmer outside. So, add some sealant. At this stage, the rack is ready, and you can hang the skis on the rack.
How Do You Decorate with Old Skis?
When your water skis are getting old, then you can try to decorate your room with these old skis. You can decorate your wall with the old skis. This idea will bring a winter vibe to your room. On the other hand, it will be a brilliant idea, and you can make your room different than earlier. One of the brilliant decoration ideas with the old skis is to use them in your bed as a headboard.
On the contrary, you can use the old skis for making your table. Not only chairs, but many people also make their chairs with old skis. So, do not waste the old skis but make something extraordinary with them.
Frequently Asked Questions
How Many Times I Will Be Able to Remount Bindings on Skis?
You are able to remount the skis many times. But there should be a limitation. It will be better to remount your ski more than three times. Professionals will suggest you not to use your skis more than three times. For the betterment, you should follow the recommendation.
How Much Will I Pay to Remount My Ski Bindings?
It is very common to remount the ski bindings. You may have required to remount your ski bindings. So, don’t be worried about remounting the ski bindings because it is very budget-friendly to remount the skis. But it depends on the season and region. Generally, you have to pay around $45. But depending on the season and region, you can cut the costs.
How Long Will My Skis Last?
There is nothing that can last forever. So, on average, you need to replace your skis every eight years. But please remember that the performance quality of your skis diminishes after 100 to 120 days of random use.
Conclusion
When you know how to hang them on your wall, then you can easily maintain the skis. You must do a hot wax of the skis after the third or fourth day of your skiing. You can make the skis fresh by using paste wax. In this case, Swix F4 will be a better choice. To maintain the skis properly, you should keep them dry. However, you can use a lock to save the skis from a thief.
There are many people who love their skis and do not want to spoil their skis. They try to find a way to give another meaning to their old skis by decorating their room with old skis. You should follow the instructions in the article to recycle your old skis and decorate the wall with the skis.