A lamp is a simple lighting object. Right? Then why the big fuss about it?
Lamps were not just a mere home appliance back in the day. It signifies light, that evades the dark. Making it a holy object.
That’s the spiritual thing about a lamp. But the emotional value of building something from scratch is more than that.
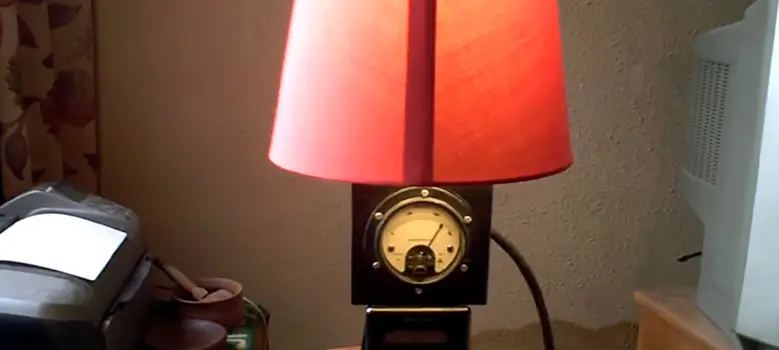
Especially if you equip it with an old electric meter. Yep! You can do that. To bring in a rustic retro feel to it, you can turn an electric meter into a lamp.
But how to make an electric meter lamp, that is the question.
Today we will guide you through two ways of making an electric meter lamp. And one of them would be a steampunk edition, so stay with us.
How to Make an Electric Meter Lamp Using Household Items
There are a lot of ways you can make an electric lamp. Simply attach a light bulb older to something and attach some wire and that’s it.
What makes a lamp special is its accessories. It not only elevates the lamp’s outlook but also its value.
Set aside building something on your own, it is an amazing piece of accessory to talk about to your guests.
With just a few household items like wooden planks, electric wire, and an electric meter, you can build a retro meter lamp yourself.
Here are the things you will need
- Wooden planks 2×6 (41”)
- Wooden planks 2×12 (16-¾”)
- Electrical switch.
- Electrical meter.
- Light socket.
- Light bulb.
- Different size screws.
- Electrical wires. (14 and 16 gauge)
- Electrical plug.
Step 1: Cut the Planks According to Your Choice
Start by cutting your 2×6 plank into different sizes. They will work as the stand and a showpiece of your lamp. So the tallest one can be 16″, the middle size can be 14″ and the last one can be 11″. You can go with your desired size. But remember, it is a lamp. So the higher the bulb is, the more area it lightens up.
Step 2: Drill Hole in the Tallest Plank
Drill a hole on the side of the tallest plank. Make it as wide as a 16 gauge wire. But avoid making it obvious from any side. You can also leave the wire hanging out from the back if you want. That would look a bit odd though.
Step 3: Make Space on the 2×12 Plank for Your Switch Board
On your 2×16 plank, make an incision for the electrical switch box. You can use any curving tool for that. Also, make 2 holes on one side of the plank where you want the electric meter to sit. And assemble all the planks to your desired design. Make sure you use screws instead of nails.
Step 4: Assemble the Wires
Assemble both 14 and 16-gauge wire. To give it a more profound look we are using these wires. As the electric meter uses large wires, we will use the 14 gauge one for the main power socket to the meter. And internal connections will be done by 16 gauge wires.
Step 5: Place the Electric Meter and Connect the Wires
Place the electric meter in its respective place and secure it with screws. Put in the wires and tighten them on the electric meter. Also, this is the time you attach the switch wires to the electric meter. Before putting on the light on the socket, attach the wires and fix it on top of the plank and secure it with screws.
Step 6: Plug in and Turn It On
Plug the end of the wire on the power socket and turn on your lamp switch. And enjoy your creation.
You can also paint it with your desired color or so a wax finish to give it a more rustic feel.
How to Make an Electric Meter Lamp Using a Ceramic Insulator
The traditional electric meter lamp is a lamp with just the manual electric meter. You can use wood to customize it to your liking. But what if you can transform it into a steampunk electric meter lamp? That would be way cooler!
This is why we have also come up with the process of making one. Follow the steps and you will get a steampunk-style lamp in no time.
Things you will need
- Old Ceramic insulator.
- Electrical click on the electrical switch.
- Lamp Bottom stand. (Preferably wooden)
- Electrical wire. (14 and 16 Gauge)
- Screws of different sizes.
Step 1: Drill Some Holes on the Wooden Stand
You will need a wooden base for your lamp. It can be of any size and thickness. It depends on how big or small you want. But preferably a round one is the best. It will act as your lamp stand and hold everything together.
Step 2: Secure the Ceramic Insulator on the Wooden Stand
Drill some holes on your wooden base to situate a ceramic insulator. The ceramic insulator is nothing so fancy but can be found in old trash yards. They are mainly used in electric poles. But for their aesthetic value, we are going to use them on this lamp to hold the light up.
Step 3: Place the Electric Meter on the Stand
Now it is time to place the lamp on the side of your ceramic insulator. As there is nothing much to do and hide, you can just place the meter a few inches away from the insulator. All connections will be done from the bottom.
Step 4: Place the Click on Switch on the Back of the Electric Meter and Secure It
Attach a click-on switch to your electric meter and connect it to the meter using 16 gauge electric wire. You can use any gauge of electric wire, but as we are using an electric meter here, a thicker wire will be best. Connect the light bulb socket to the same type of wire through the ceramic insulator to keep it out of sight. Place the bulb socket on top of the insulator and secure it with screws.
Step 5: Make the External Connection With 14 Gauge Electric Wire
Using a 14 gauge wire, you have to connect the meter to your electric outlet. As the electric meter is used to higher power electrical output, this will not only give the same vibe but also keep your lamp in sound condition.
Step 6: Turn It on and Enjoy
Attach a light bulb to your lamp and try turning it on. You will see the meter while running and the light is also working just fine. You are done making the lamp at this stage. For the extra punk look, you can use the brown, maroon, and gold color mix and paint it. Enjoy your lamp after that.
Frequently Asked Questions
How does electricity work on a meter?
Electric meters work by measuring the instant electric flow and the outgoing current used by home appliances. Residential meters are most of the time directly connected to the house rather than having transferred in between.
How to connect an electric meter to the pole line?
Electric meters have 4 lines that you need to connect in order for them to work. You have to connect it in order like Line hot wires, load hot wire, ground wire, and a neutral wire. Though not all places require a ground wire, you have to install it for the safety of your home appliances during lightning.
Conclusion
An electric lamp can be placed not only on your bedside, but it can be a conversation starter if you place it in your living room or dining. It will provide you with the light and also a show from the meter. As the old meter wheel goes round and round, your guests will be amazed at your work of art. Rather than staying with the boring table lamp, put a twist to it using an electric meter.

