If you’re a boat owner, having a reliable marine toilet is essential for comfortable and convenient sailing. Jabsco Marine Toilets are known for their durability and user-friendly features, making them a popular choice among boaters. Installing a Jabsco Marine Toilet may seem daunting, but it can be straightforward with the right instructions. In short, this article will provide step-by-step instructions on installing a Jabsco Marine Toilet on your boat.
What Are the Instructions for Installing the Jabsco Marine Toilet?
Before beginning the Jabsco Marine Toilet installation process, gathering all the necessary tools and equipment is important. You can break down the installation into several key steps once you have everything. In this article, we will guide you through each step of the installation process, providing detailed instructions and tips to ensure a successful installation of your Jabsco Marine Toilet.
Gather Necessary Tools and Materials
Here is a list of items you will need. You can find these items at most marine supply stores and online retailers. Double-check that you have all the necessary parts and tools before installing to avoid any delays or setbacks.
Tools:
- Drill
- Screwdriver
- Adjustable wrench
- Pliers
- Hacksaw or PVC cutter
- Silicone sealant
- Teflon tape
Materials:
- Jabsco Marine Toilet
- Holding tank or direct discharge kit
- Hose clamps
- Flexible hose
- Mounting bolts or screws
- Backflow preventer
- Through-hull fitting
Instruction 1. Remove Old Jabsco Marine Toilet
Replacing an old marine toilet with a new one can be a necessary and straightforward process, but it requires specific knowledge and tools. In this response, I will guide removing an old Jabsco marine toilet.
Step 1. Shut off the water supply: Locate the water inlet valve that supplies water to the toilet and turn it off. And this will prevent water from flowing into the toilet during removal.
Step 2. Disconnect the water supply line: Use a wrench to loosen the nut that connects the water supply line to the toilet inlet valve. Once the nut is loose, detach the water supply line from the valve.
Step 3. Disconnect the waste hose: Use a pair of pliers to loosen the clamps that secure the waste hose to the toilet and the holding tank. Once the clamps are loose, detach the waste hose from the toilet.
Step 4. Remove the bolts: Locate the two bolts holding the toilet.You can usually find these bolts near the floor at the toilet’s base. Use a wrench to remove the nuts that secure the bolts.
Step 5. Lift the toilet: Carefully lift it straight to remove it from the base. Be sure to have a helper to assist you in lifting and carrying the toilet out of the bathroom.
Step 6. Clean the area: Once the old toilet is removed, use a disinfectant cleaner to clean the area around the toilet’s base thoroughly.
Instruction 2. Install Jabsco Marine Toilet
This guide is designed to give you clear and concise instructions on installing a Jabsco marine toilet on your boat. Whether you’re a seasoned boat owner or a beginner, you’ll find the process easy to follow and complete with the right tools and knowledge.
Step 1. Preparation: Turn off the boat’s water supply before installing and disconnect any existing toilet. Remove the old toilet and any remaining debris from the area. Measure the distance between the toilet flange and the through-hull fitting to determine the length of PVC (PolyVinyl Chloride) pipe needed.
Step 2. Mounting the Toilet: Place the Jabsco marine toilet on the mounting surface and mark the locations of the mounting holes. Drill the holes and secure the toilet with screws and bolts. Apply silicone sealant around the base of the toilet to prevent leaks.
Step 3. Installing the Flange: Place the toilet flange on the existing hole and mark the locations of the flange screw holes. Drill the holes and secure the flange with screws. Apply silicone sealant around the edge of the flange to prevent leaks.
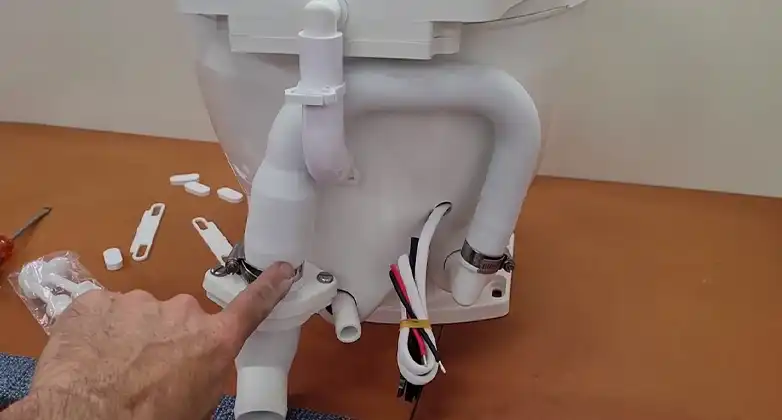
Step 4. Connecting the PVC Pipes: Cut the PVC pipes to the appropriate lengths and use PVC fittings to connect them. Use hose clamps to secure the fittings and pipes together. Connect the PVC pipe to the through-hull fitting and the toilet flange.
Step 5. Testing the Installation: Turn on the boat’s water supply and flush the toilet to test the installation. Check for leaks and adjust the fittings as necessary.
Step 6. Securing the Pipes: Use clamps or straps to secure the PVC pipes to prevent movement or damage.
Step 7. Final Check: Check the entire installation again for leaks or loose connections. Tighten any fittings or connections that may need it.
Important Note: The installation time for a Jabsco marine toilet can vary depending on the installer’s experience level and the installation’s complexity. On average, it can take between 2-4 hours to complete the installation process.
Frequently Asked Questions and Answers
Are the installation instructions compatible with all Jabsco marine toilets?
No, the installation instructions provided by Jabsco are specific to certain models of their marine toilets. Ensuring you have the correct installation instructions for your particular model is important.
Are there any specific plumbing or electrical components I need to use?
Yes, Jabsco marine toilets require specific plumbing and electrical components to function properly. It is recommended to use Jabsco branded components or components the manufacturer recommends to ensure proper compatibility and operation.
Do I need special tools or equipment to install a Jabsco marine toilet?
Yes, installing a Jabsco marine toilet requires specialized tools and equipment, including a hole saw, a screwdriver, a wrench, and a drill. To ensure that you have all the necessary tools and equipment before starting the installation, it is recommended that you refer to the installation instructions.
Conclusion
The installation instructions provided by Jabsco for marine toilets are a valuable resource for boat owners seeking to establish a dependable and effective marine toilet system. With its clear and concise step-by-step instructions and detailed illustrations, boat owners can install their marine toilet easily and assuredly, ensuring a dependable and efficient system to enhance their boating experience.