If you have a foyer or a large room with a high ceiling in your home, a chandelier is the best decorative option. It adds a unique decorative touch to any home.
However, installing a chandelier may seem complicated when it is designed with multiple bulbs. And, if you don’t know how to wire a chandelier with multiple lights, it won’t lighten your room despite being hung in the ceiling. For this reason, you need to understand the right wiring process of a chandelier before directly going into the installation.
Things You’ll Need For Wiring A Chandelier
When working with any chandelier, you must work close to the ceiling. So, all the necessary instruments should be arranged first if you want to avoid disturbance. In this project, you need the below tools for performing the wiring.
- A Ladder
- Electrical Tape
- Wire Connectors & Strippers
- New Sockets
- Chandelier Cord
- Screwdriver
- An Electricity Tester
The Wiring Process Of A Chandelier With Multiple Lights
Before starting this type of electrical project, you must turn off the power. Generally, people switch off the chandelier only. But, there is a risk of turning it back on accidentally by another person. In such a condition, you may overlook this matter from the ladder because of concentration on the tasks. Therefore, ensure your safety by turning off the master switch. Then, move on to the final wiring process.
- First, the wires will become powerless after turning off the breaker box. Now, you should install the electrical box on the spot where you want to hang the chandelier. Generally, these electric boxes are installed in the center position of every ceiling. If not, then you need to install it manually.
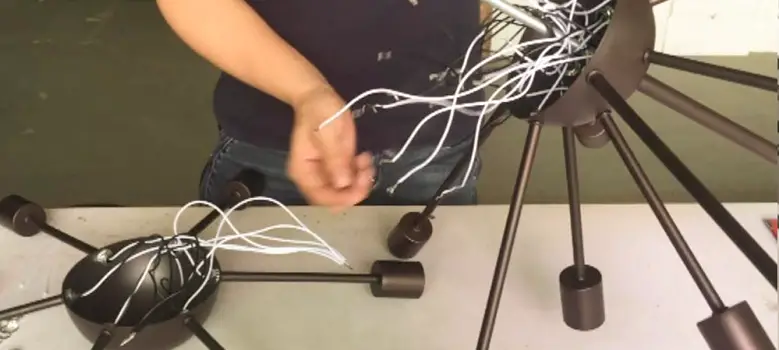
- Second, keep the chandelier on a tabletop and start arranging the setup. In that case, your chandelier is totally powerless, as there is no connection between the electricity and the chandelier. Now, place the chandelier in such a position on the tabletop so that it remains in front of you. Positioning on the upper or lower side will create difficulties for the work.
- Then, check out the wires of the chandelier. Usually, every chandelier comes with an automatic wiring system installed in it. This system creates connections with all the chandelier bulbs and takes out the wires with the cord. Sometimes the branch wires run through the chandelier arms. Otherwise, they are looped into the arms.
- Afterward, you should set the electrical box in the ceiling. This box also includes some wire connectors, which are used to set the wiring of chandeliers. So, for the test purpose, bring the wires to the junction box from the chandelier.
- At this stage, you need to connect all the wires according to the matched color and manufacturer’s instructions. Besides, you shouldn’t mix up the wires with each other. Instead, connect them separately, and sometimes, use the tape to keep them separated.
- Suppose, your chandelier doesn’t have enough wires to connect from below. In that case, temporarily hang the chandelier at the ceiling and connect the wires thereafter. Make sure the wires are attached correctly. Then, turn on the electricity to check if the light bulbs are working correctly.
- Now, find out if any bulb doesn’t light. As a new chandelier, all bulbs should be lightened up. Some lights may not lighten up if you are rewiring or hanging a previously installed chandelier. In that case, mark the light bulbs and stick a piece of tape into those bulb-attached arms.
- After that, turn off the electricity again and remove the bulbs from the chandelier. Now, give power to the chandelier and use the tester to check if there is any electricity flow running on the marked arms. Specifically, you should put the tester into the pins of the bulb holder to check the electricity. If the tester turns on the light, then there is no problem with the wire. Rather, you need to change the bulb itself.
On the other hand, you need to check that wire from the root level when you are not getting any electricity from the bulb holder. So, put the tester on the wire end of the junction box. If you don’t find electricity there, you’ll have to change the whole wire. And, when you get the current flow there, maybe there is a problem with the wiring of that specific line.
- Since you’ve found the damaged wires now, you need to install new wires to those lines. So, detach the bulb holders from the chandelier and cut the damaged wires from that holder. Now, get the new wires and use wire strippers to remove a little bit of insulation from both ends of the wires. Remember to twist the stranded wires to keep them into one piece.
- After arranging all the new wires, connect them to the bulb holders. To do this, take the specific wire end and bend it like a hook. Then, put the wire into the terminal of the holder socket to secure using the screw. Follow the same method for all wires. Then, take out the wires through the chandelier arms.
- As the wires are now ready, connect them to the junction box wire. Here, you should ensure that all the new wires are installed correctly in their places. Now, install the bulbs again and turn on the electricity to check if all lights are working. If not, then you need to follow the same process again for that specific light bulb.
- Finally, you can close the junction box cover and screw it into place. Then, give a final check to every wire and chandelier arm. After that, hang the chandelier in your selected position and finish the wiring process.
Frequently Asked Questions
How Do I Wire A Light Fixture With Multiple Lights?
Actually, a chandelier is a type of classy light fixture solution. So, the wiring is the same as the process mentioned above. According to the structure, all light bulbs have an individual wire and connect to a primary wire. And, you need to connect that wire to the junction box and give power to it. This way, the wiring can get your bulb to lighten up the room.
How To Connect Chandelier Lights Together?
As all the chandelier lights turn on together, you can use a primary wire to connect all of them. First, take out individual wires from each light bulb and attach them together into a primary wire. Anyway, this wire should be able to take the current of multiple bulbs. After joining the wires into that wire, attach it to the wire of the junction box, and all your chandelier bulbs are now connected together.
Final Speech
Though wiring a chandelier with multiple light bulbs may seem critical in the first look, it’s actually pretty easy once you understand the mechanism. In the beginning, you need to arrange the wires for every bulb individually. Certainly, these wires will be connected to the junction box using a primary wire and give the power to turn on the lights. In this way, you can wire any number of light bulbs in a single chandelier.



i like your article