
It is common to build mortar walls by mixing sand, cement, lime, and water. They are constructed by attaching chicken wire or wire mesh to wall studs. A layer of plastic sheeting covers them next. In addition, they are mixed to form fat mud. Before reinstalling a brand-new finish material in your bathroom, you must remove the wall tile, mortar, and wire mesh.
Most individuals can remove tiles from walls without the assistance of a professional contractor. It may seem straightforward, but there are specific ways to make this task safer and more accessible. In our guide, you can learn how to remove tiles from the wall yourself.
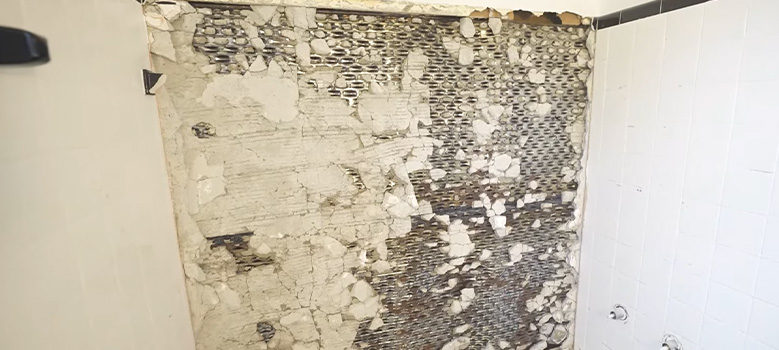
How to Remove Wall Tile Mortar and Wire Mesh
The purpose of this tutorial is to demonstrate how to remove mortar from wall tiles using wire mesh. There’s no going back once you start this project, for better or worse. It would help if you prepared for whatever you may find beneath the tile, behind the walls, or inside the drain. If you are committed to getting it done, let’s move forward. Here’s how to remove mortar from wall tiles using wire mesh step by step.
The Materials You Will Need
- Hammer and crowbar
- Heavy duty gloves
- Dust mask
- Safety glasses
- Large dumpster/garbage can
- Broom and shop vac or similar
- Razor blade, chisel
- Patience
Step 1
Using the chisel, strike the tile along the edge where the trim meets the plaster. These pieces should break off easily and allow you to access the mortar. Make a chisel mark on the mortar where it joins the wall plaster. It’s time to remove some mortar from the lath and studs.
Step 2
With the pry bar, pry the strip away from one of the studs you have exposed. To check the nails, poke a stick through the mortar at the point where they attach to the stud. Work gloves help peel mortar and lath from a wall as it breaks away.
Step 3
Using a chisel, break up the mortar and lath from behind by exposing and pulling down sections. Using this method, you can remove the strip and mortar from the room more efficiently. In some cases, the tile will continue to be attached to the mortar so it can come off in sections of the lath.
Step 4
Using a hammer, break the tile and mortar at the bottom where it meets the floor. It will separate this mortar from those used under the floor tiles.
What is The Best Method for Removing Wall Tile Mortar?
First, remove the tile from a mud wall before removing the mesh and mortar. Using a hammer and chisel, you should be able to pop off the tile if the walls are waterproofed with a latex coating. Using an oscillating power or rotary tool, cut out the grout from the joints to allow the tiles to pop off individually if you want to salvage the tiles.
Direct application of thin-set mortar will result in a cementitious bond between the concrete mortar and the thin-set mortar. When you pry these tiles out of the mud, you will need an automatic hammer chisel (a handheld power tool).
A tile bonded directly to the mud, rather than a top layer of latex waterproofing, is tough to salvage since large chunks of mortar remain attached. Using a handheld power tool takes less time and effort than hammering and chiseling manually.
What is The Process for Exposing and Removing the Mesh?
It is usually 1/2 inch or 1 inch of concrete on the mud wall after removing the tiles. And this depends on how to plumb the wall framing (mud walls must be floated plumb for proper tile installation). You can also use the automatic hammer chisel to chip away mud and expose the wire lath if you are using the tool. If not, you can also use a hammer and chisel.
During the first stage of concrete removal, wire mesh is typically installed with nails or staples to hold it in place. The only tools you’ll need to remove the fasteners are a hammer, pry bar, or cat’s claw. You can try speeding up the process by exposing roughly 6 to 8 inches of the wire mesh at the top of the wall.
Using a jerk motion and holding onto the mesh, jerk the wire from side to side as you remove it from its fastenings to break the concrete and the mesh at once. To make the mesh more manageable, use a pair of tin snips.
Warning
Wire mesh will readily cut exposed skin because of its exceptionally sharp edges. Work gloves, respirators, safety glasses or goggles, and thick, long-sleeved shirts, boots, and long pants are required. The removal of mortar will generate a lot of concrete dust, so a dust mask is inadequate. Gravity can cause hazards when removing tile or mortar if you start at the top. To avoid damaging your floor surface with falling tile and concrete mortar chunks, ensure you cover and protect it in your demolition area. Padding made of foam is ideal for this purpose.
Frequently Asked Questions
How Do I Remove Mesh Tile Backing?
Cover the bottom of a shallow baking pan with just enough water to cover the back portion of the stones. A knife or putty remover can scrape the glue once it has softened. It is easy for the mesh backing to fall off during the process.
How Do You Remove Cement from Behind Tile?
If the mortar is particularly thick, such as more than 1/8 inch, apply muriatic acid directly to the back of the tile. Apply pure acid to the mortar with a paintbrush. After loosening the concrete, gently scrub and remove the excess with your scrub brush and water. If necessary, apply more.
Conclusion
There are many difficulties in removing wall tile mortar and mesh. The walls were created by nailing metal lath to all the studs in the house, then plastering over that. A plaster layer could range in thickness from 1/2 inch to an inch. Tile installers left off the plaster in areas where they would lay tiles and used mortar 1/2 inch thicker than the plaster. In other words, you need to remove an inch or more of mortar.


